Well this is a little different for me and has been sitting around waiting to be finished since forever. I did the Cellini Spiral months ago but did not want the whole bracelet in it. http://www.tarnhelm.com/NeedForBeads/Cellini.htm However I was stumped about what I did want to do. I simply changed to my standby Russian Spiral. I used only the smaller two sized beads. The 11 and 15 and it made the bracelet more flexible. The bead at the end is a piece of turquoise that my sister in law gave me when her daughter made her a super necklace. The loop was a little large so I modified it to be arrow shaped and that seems to help. The first time I wear it I will know if I really did correct to too large opening.
I now only have one long time on deck project and it is with square Swarovski crystals and tiny gold beads that I am making into peyote rings to hold the open square crystals. I think it will have to be a gift as I would need one more crystal to make it large enough for my wrist.
It will have to be someone very special as it takes forever to make the darn rings.
Now for the fun stuff...My daughter Jessica and her kind husband Michael and baby boy Jay took me kayaking with them today. I absolutely had a ball. What a great couple to include the old lady and I am the one that make the baby cry...awe. How fortunate that they have 3 kayaks. I do recall that Michael mentioned that he needs to sell one of the kayaks...could that be a hint????
So You want to learn the simple weaving that makes Russian Spiral both easy and beautiful. I will try to help with a few pictures and some tips that I have gathered in the last year or so. These are the tips that help me. You will come up with some of your own as each of us have a little different technique of putting needle to beads to create this pattern. (Click on the pictures for a closer look!)
First decide on the color and combination of sizes you wish to use. I would recommend that you start with two distinctively different colors as well as two different sizes. The smaller size should be the two beads in a group that calls for one large and two small repeated throughout the length of the bracelet or necklace. My selection here is larger lighter green and smaller darker. They are 11/0 for the large and 15/0 for the small. You may wish to start with an 8 for the large and 11 for the small if you think it will be easier for you to see where to insert the needle aswell as a faster finish! (I always suggest that you use a good glass bead so the sizes are more likely uniform and the final product is worthy of the time you will spend.)
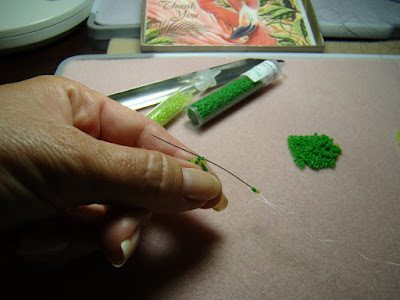
I am using 4# Fireline fishing line and I get mine at a sporting good store rather than a bead store as the product is the same and the price is about half! I start by threading a #10 or 12 needle. I use one light (11) and two dark green (15) beads three times on the thread.
I leave about a 10 inch to 12 inch tail of thread ( to attach my finding when I am finished) and tie a knot to form a circle. I run the needle through the next small bead to the knot and carefully pull the thread through. Careful not to tangle the thread as I have about 2 to 3 yards on the needle and it is single strand sewing/weaving.
We are ready to weave now. If you are right handed you will work from right to left or counterclockwise with the needle. If you are left handed you will work from left to right or clockwise. Place one large and two small beads on the needle and insert the needle in the first small bead beside the large to your left on the circle of nine beads.. It will take a little manipulating of the needle and bead to get it inserted. As you add the three beads each time you will insert the needle in the next small beside large working around the circle. After you work the first three groups you will have a spiral that is flat. Continue to do another round in the flat as that will help keep your place make certain you are working only in the outter most round and adding the three beads and inserting the needle into the first of the two small beads beside the larger working left.
I hold the work between my thumb and index finger to keep it flat as I draw the thread through carefully...tangles do happen and take some patience and two needles to get undone sometimes.
When I have a total of 27 beads added in a flat spiral, I am ready to tighten up the work and bring it into a tube of woven work. I hold the tail end of the thread around my little left hand finger and start to tighten up and draw the beads around to form the spiral tubular look. It takes a little work to align them so that there are three large as you look down on the third round of beads. I tend to squeeze them with my thumb and index and roll the beads back and forth to help align them...confused? It makes more sense when you are doing it than reading honest!
Notice the three large beads visible on the top round.
It makes for a finer product if you keep your work tight. I do the rolling of the beads as I apply pressure to the end of the thread to continually tighten up my work. As you bead this pattern it will get better each time until is it all very uniform and snug and lovely!
It is time for the boring part of continually adding the three beads and weaving them in as you build your bracelet.
Where did that end come from and why did I not photograph the process and the stages. Stupid that is why. I forgot and well what can I say? However I do both ends exactly the same so when I finish off the bracelet I will do the step by step of attaching the findings. (fasteners) A quick comment about the SS Flamingo that is attached. We are the Flamingo House and thus my signature charm
When the bracelet reaches approximately 6 1/2 inches long I make my final round. The final round I do as one large and one small only three times. That is 6 instead of 9 beads for the final round. I snug the up tightly and insert the needle through a few more beads in the round and knot it securely.
.
Next step is the same as I did for the attached toggle. I start with a large bead, a small, a second large and a second small. Then I run the needle through a quarter inch of French Wire. (French wire is available in gold tones and silver tones in real or not metals. It is really a coil of thin metal that is a protection for the thread so the findings do not wear on it.)
I finally add the lope end of the finding in this case a heart shape in sterling silver, then I thread the needle through the small bead again. I add the second leg of the holding by adding another large bead, another small bead, and a final large bead...four beads each side of the leg if you count the shared small one right before the French Wire was added.
I knot this leg to the top of the bracelet on the opposite side from the first leg. I then run the needle through 4 or 5 small beads down the bracelet and knot again. I do that again so there are about 3 holding knots. I then run the thread a few more beads down and then trim off the thread and I am DONE!
How long did I work on that bracelet and why did it take so darn long you ask? Well, it was a lot of beads to sew together. It probably took between 50 and 70 hours. And I do have a life you know...kind of!
The snaps were part of the "finds" from my parents house last summer. I am thinking that Mother used the other two on something years ago...the price was 10 cents for the pack!